[UPDATE: Notes on Part 2]
I’ve been working through the excellent Pedestal tutorial and I am genuinely excited about Pedestal.
So excited about @pedestal_team – the last time I was this excited about a new technology was Ruby on Rails in 2005. Giddy!
— Peter Christensen (@christensenp) January 18, 2014
lol @pedestal_team event delta playback is bi-directional, like database migrations in Rails. So awesome it’s silly
— Peter Christensen (@christensenp) January 18, 2014
It’s such a simple, Clojure-y approach to single-page web apps. I expect it to face slow and limited adoption because it’s a very different and strongly opinionated approach with a steep learning curve. It’s not possible to sip Pedestal, you have to swallow it whole. But whether or not you use it for any projects, it’s worth working through to experience its design principles. (Kind of like Lisp.)
Some of the key principles:
- The application is split into data, application model (the structure of how the data will be rendered), and the rendering.
- No callbacks – every function does some simple work and puts a message on a queue.
- Server and client code should be separate, and indeed are in different projects.
- Apps should handle 2-way data from multiple sources.
There are a few minor changes from Pedestal 0.1 to 0.2, and this affects the tutorial. They’re mostly called out in the wiki but here’s another heads up:
- Configuration changed from config/config.clj (referred in text and present in the code repo) to config/config.edn. I think the file contents are the same, as EDN is a subset of Clojure.
- When running a repl for a v0.2 app, you do not need to run (use ‘dev)
- The test files started in a separate directory (tutorial-client/test/tutorial_client/test/behavior.clj) in v0.1 but moved to the same directory as code files and using a naming convention in v0.2 (tutorial-client/test/tutorial_client/behavior_test.clj)
Here are my notes on the 15 sections of Part 1. Next up, Part 2!
- Getting Started
- Separate projects for client and server (?)
- lein new pedestal–app [project-name]
- lein repl
- (start)
- Index page has links http://localhost:3000/
- Dev homepage has hidden nav links in bottom-right http://localhost:3000/tutorial-client-dev.html
- Pedestal projects product a set of deployable front-end files for single-page apps. Not a back-end
- Making a Counter
- How to trigger changes in a pedestal-app application: A pedestal-app application is essentially one big object. It contains state, and that state is changed when it receives a message. Messages are data. At a minimum, each message has a type and a topic.
- the message’s type is a dispatch value often used to determine which state transition function should be called
- the topic determines the location in the data model where the function will be applied (may also be used for dispatch)
- The code for behavior is located in tutorial-client/app/src/tutorial_client/behavior.clj (this project layout is not required – Pedestal-app projects do not enforce a specific source code layout)
- Path matching
- One element: [:inc [:*] inc-transform]
- Any path: [:inc [:**] inc-transform]
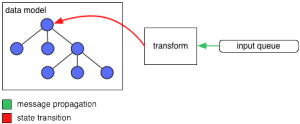
- How to trigger changes in a pedestal-app application: A pedestal-app application is essentially one big object. It contains state, and that state is changed when it receives a message. Messages are data. At a minimum, each message has a type and a topic.
- Incrementing the Counter
- Each emitter vector has two elements: a set of inputs and an emitter function.
- [#{[:*]} (app/default-emitter [])]
- The vector passed to default-emitter is a prefix which will be added to all emitted deltas.
- The emitted deltas can be seen in the JavaScript console.
- The Data UI receives these changes and draws them for you as a nested tree.
- :transform-enable format: [:transform-enable [:main :my-counter] :inc [{msg/topic [:my-counter]}]]
- Transforms are part of the application model but not the data model
- Why use transforms?
- :transform-enable provide an abstraction for messages
- Tests can be written that discover which actions may be performed by responding to :transform-enable deltas.
- having a standard way to describe messages allows for renderers to be created which can automatically render user interfaces during development, generate administrator user interfaces and leverage lots of standard library functions for wiring up events.
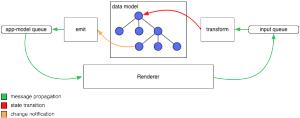
- Each emitter vector has two elements: a set of inputs and an emitter function.
- Simulating Service Push
- Lets you continue work on the client side of the application and delay work on the service until it is actually required
- The io.pedestal.app.util.platform namespace contains functions which require platform-specific implementations
- The app starts the [project-name].simulated.start (configured in config/config.edn if you generate the project, or config.clj if you follow their repo), and that main function is what starts the app in [project].start. The simulated services start in the same method.
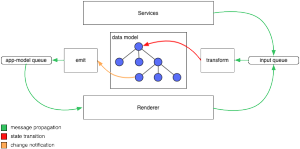
- Simulating Effects
- Transform functions deal with input
- Emitters take an input map as input and return a vector of rendering deltas
- An effect function takes its inputs as arguments and returns a vector of messages to be sent out of the application. These messages can be arbitrary Clojure data, and there are no rules about what can be done with them.
- Effect messages are put on a queue to be consumed by a service.
- Add a function in [project].simulated.services to receive the messages, and pass it to app/consume-effects in [project].simulated.start main
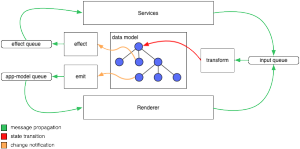
- Derived Values
- Derive functions allow you to compute new values from any other values in the data model. A derive function will be called when any of its inputs change. Derive functions can be arranged into an arbitrary dataflow
- Derive functions are configured in the dataflow definition by adding a set of configuration vectors under the key :derive
- Each derive configuration vector can have three or four elements
- [inputs output-path derive-fn input-spec] ;; input-spec is optional
- input-spec values can be :vals, :single-val, :map, :map-seq, :default
- Using a map to describe inputs allows you to give useful names to the keys in the argument map
- We can use a derive function to create a single list without destroying the original values
- Dataflow helps you to reduce coupling in a program. Notice that the derive functions above don’t know anything about where the input data comes from or where the output goes. This makes the code simpler, more reusable and less likely to change.
- With dataflow programming, when you need to add new features, you tend to add new functions instead of changing existing ones. This makes code easier to maintain over time.
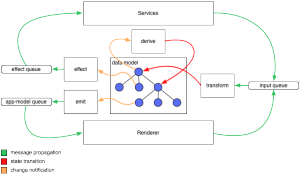
- Debug Messages
- To get the time it takes for a dataflow transaction, add :debug true to the dataflow definition, add a transform and an emitter
- You can manipulate messages, emitters, derives, etc with debug messages – they’re the same data
- Post Processing
- apply some transformation to data that cuts across many different parts of the data model or application model. For example, you may want to format some output as currency or convert some input from a string to a number
- A post processing function takes a message and returns a sequence of messages. Post processing functions can filter, transform and expand messages
- A post processing function takes a message and returns a sequence of messages. Post processing functions can filter, transform and expand messages
- In behavior, add the post-processing namespace, wrap the app in your post-processing function before passing to app/build
- This is the complete behavior of the app. It could have been written test-driven without a browser, and there was no work required on rendering or back-end services
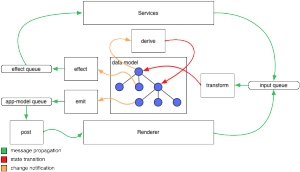
- Making an HTML Template
- Template directory – Tools→ Design or /design.html – links to all HTML templates for the project
- lives at tutorial–client/tools/public/design.html
- Nothing in pedestal-app requires that you use this
- <_within> and <_include> tags are used to wrap or insert files
- uses matching top-level div ids to find where to put file
- only used at development time, not part of pedestal-app templating system
- Defining templates:
- template attribute on an HTML element makes that element a distinct HTML element that can be referred to by name
- field attribute describes how data is mapped from a Clojure map to this template
- You can define a mapping to several attributes by using a comma-delimited list, e.g. field=”class:c,width:w,id:my-id”
- HTML attribute name on left of :, Clojure map key on right
- ?? created elements are assigned attributes according to this mapping
- Pedestal-app currently supports the compilation of SCSS. Just place SCSS files in the same location as the CSS file above, and they will be compiled to CSS along with everything else (must be configured)
- Template directory – Tools→ Design or /design.html – links to all HTML templates for the project
- Slicing Templates
- Pedestal-app does not enforce how templates are made. A single HTML file can contain one template or hundreds of them. How template HTML is organized will depend on what makes sense for a project.
- Slicing Templates – create a map, which is available to the ClojureScript program, which contains all of the templates that you will use, extracted from source
- tutorial–client/app/src/tutorial_client/html_templates.clj, io.pedestal.app.templates namespace
- tnodes converts a sequence of files into Enlive nodes
- 3rd arg is a vector of Enlive selectors of nodes whose template contents to clear
- tfn – for creating static templates that don’t need to be updated after being added to the DOM
- dtfn – for dynamic templates – pass a set of nodes and a set of static fields that won’t be updated after adding to DOM
- Any time you make changes to the namespace tutorial-client.html-templates the server will have to be restarted or this code reloaded in order for the changes to take effect.
- Rendering
- Rendering is more general than binding data to HTML (see Part 2)
- Recording interactions – Pedestal-app allows you to record an interaction once, then play it many times while working on the rendering code. This allows you to easily replay the same scenario many times and to focus on rendering without having to worry about running the rest of the system.
- In the generated project, the only aspect which allows for recording is the Data UI. This feature can be added to any aspect.
- For aspects where enabled, hit Alt-Shift-R (Option-Shift-R on Mac) to start/stop recording
- When finished, saves to tutorial–client/tools/recordings/tutorial–client/[recording-key ].clj
- Since recordings are a file, You could even create an interaction that the application cannot yet produce. This would allow you to work on rendering and the application logic simultaneously
- Playing Recordings
- http://localhost:3000/_tools/render
- [name] – plays through all deltas at once
- break – play through, stopping at :break deltas which can be added to the data
- step – one delta at a time
- Rendering – A rendering function can be provided to the application which will be called after every transaction and passed the sequence of deltas produced and the input queue.
- This function will have some side-effect, drawing to screen, posting to a service, etc
- in [app-name].start, you pass render-config, which is defined in [app-name].rendering
- [:node-create [] :map] – root of the application model tree
- [:node-create [:main] :map] – root of the tutorial application. This delta will be rendered by adding the main template to the DOM, all subsequent rendering will fill in the values of this template
- A render configuration is a vector of tuples which map rendering deltas to functions. Each vector has the op then the path and then the function to call.
- every rendering function receives three arguments: the renderer, the delta and the input queue.
- The renderer helps to map paths to the DOM.
- The delta contains all of the information which is required to make the change and the input queue is used to send messages back to the application.
- The most common part of the delta to grab is the path.
- The function templates/add-template associates the template with the given path and returns a function which generates the initial HTML. Calling the returned function with a map of data will return HTML which can be added to the DOM.
- Rendering Transforms
- No callback hell – every callback function in pedestal-app does one thing, it creates a sequence of messages and puts them on the input queue. All input messages, both those generated by user events and those which come from services, follow the same path through the application.
- Create :transform-enable and :transform-disable to move back and forward through playback events, like Rails DB migrations !!!
- Changing a value in a template
- By design, most of the values that will be plugged into the template have a path which ends with the template field name. This allows for one function to handle all of these updates.
- templates/update-t has three arguments: the renderer, the path that the template is associated with and the map of values to update in the template
- Rendering Lists
- You can write a generalized render-template creator function, that returns a specialized render fn for each use case
- you should now be able to step forward and backward in the rendering aspect and see each of these functions performing its specific task
- When viewing Development or Production tools, only the local counter value is displayed. As you may know, if you have been paying attention, that is because the back-end service has not yet been implemented. Out of the box, only Data-UI is configured to use the simulated service
- Aspects
- The pedestal-app development tools are themselves just a Clojure web application and can easily be modified to meet the specific needs of a project
- Data UI – run application logic without a renderer and with a simulated back-end
- Render – render without running application logic
- Development – run everything in development mode
- Production – run everything with advanced compilation
- In config.edn, :aspects hash, :ui key
- :optimizations, :compiler option – set optimizations to use when viewing this aspect
- :output-root key determines where compiled output will be written on the file system. There are two possibilities: :public and:tools-public
- :main – which function to run to start the application
- :params – cause an aspect to send a parameter
- selecting a renderer at runtime based on parameters can be very useful, e.g. for A/B testing, incrementally releasing a new renderer, selecting completely different renderers based on the device type
- The pedestal-app development tools are themselves just a Clojure web application and can easily be modified to meet the specific needs of a project
- Making the Service
- Tutorial is mainly about client – this shows how services interact with Pedestal clients and how to organize and integrate client and service code.
- Project setup
- in parent directory of [project-name],
- lein new pedestal–service tutorial–service
- When the application starts, the client will subscribe. Each time the local counter is updated it will be published to the server.
- Services can be tested using curl – create pub/sub clients
- The Pedestal philosophy is to keep service and application projects separate and to test them independently. Including service and application code is a single project can lead to unnecessary coupling which makes it harder to understand how the whole system works.
- Connecting to the Service
- Follow the same interface as the MockService implemented earlier – implements the Activity protocol and the function namedservices-fn to handle outgoing messages
- new version also creates an EventSource for receiving Server Sent Events and an XMLHttpRequest for sending outgoing messages
- in tutorial-client/app/src/tutorial_client/services.cljs
- Wire up service code – in start.cljs, create the service, consume the events from the service, start the services
- Single origin policy – the dev server is serving client app code, not the service. Must symlink to service code from service project
- mkdir resources
- cd resources
- ln –s ../../tutorial–client/out/public
- To tell the dev app about the service, in tutorial-client/config/config.edn, :application key, add:
- :api-server {:host “localhost” :port 8080 :log-fn nil}
- Clicking on the links in the development server will actually cause compilation to happen before redirecting to the service
- Reloading a service url (port 8080) just reloads the compiled output from the client project, doesn’t compile newest changes
- This service doesn’t handle losing a client – it throws an exception
- Follow the same interface as the MockService implemented earlier – implements the Activity protocol and the function namedservices-fn to handle outgoing messages
Leave a Reply
You must be logged in to post a comment.